

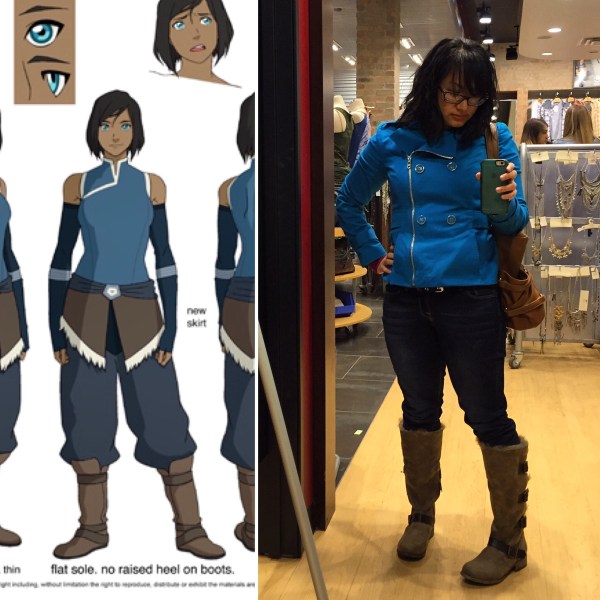
Back in February I announced I would be doing a Korra cosplay, specifically her Book 4 outfit. Unlike most cosplays I’ve done in the past, this was the only one where I didn’t have a single item beforehand that could be useful for the costume. Usually there’s shoes or some shorts or something to use as a jumping off point, but this time there wasn’t anything. Except my hair. Hurray dark-colored hair and tan skin! I got that going for me. But, for everything else, that meant I’d have to either buy it or make it.


Taken by my fiancé in a little area near our house. (Jan 2017)
Make All The Things!
I’ve gotten confident enough in my sewing now that I wasn’t too terrified (okay a tad bit terrified) to make everything from scratch. There were times during the process where I was really tempted to just buy some navy blue pajama pants off Amazon and call it a day. But I wanted the experience of making it and I wanted to get it exactly right with the colors and fabric. So that meant making everything from scratch.
I wrote this in the order that I made them, but feel free to jump down to whatever section you’re most interested in.
Store-bought items | Armbands | Butt Cape | Leotard | Belt | Belt Buckle | Pants | Bending Props
Store-bought items
I had bought brown and blue fabric as well as faux fur from Joann’s back in 2012 when I initially wanted to make Korra, so thankfully I didn’t have to buy that again. Then, miraculously, while walking around Old Mill District here in Bend, I came across these amazing boots from Buckle, the “Now or Never Jackiel.” They were perfect.
Korra’s Armbands
First thing I made were Korra’s armbands. I had some experience making these when I made Blake, so I wasn’t too worried about it. I like working on smaller pieces first when starting a cosplay to build up my confidence leading up to more complicated pieces (in this case, the leotard). I used two different types of fabric, a light blue cotton blend for the accents and some sort of sturdy stretchy fabric whose composition I don’t remember at all. (Sorry!)
After measuring the length of my arm, my wrist, forearm, and biceps, I cut out the dark blue fabric to around those measurements, but not precisely. I also cut out the light blue rectangles and hemmed them before sewing them to the square dark blue fabric. Once it was one solid piece, I turned it inside out, wrapped it around one of my arms, and pinned it in place with my other hand; not super precise, but I knew for sure it’d fit. I sewed it all shut and voila! Armband. I reinforced the stitched with one more stitch just to be on the safe side, then did that for the other arm. After turning it right-side out and trying both armbands on, I turned it inside out one last time to trim the extra fabric.


Korra’s Butt Cape
I started with the brown pieces. Turned out I had already tried to make her Book 1 waist sash, so I was kind of in the ball park. I ended up trimming them down a whole lot though cause you’ll notice her butt cape is much shorter in Book 4 than in Book 1. I started with two symmetrical brown pieces: one for the front and one for the back. Once I was happy with the fit and size, I cut one of them in half to make the front pieces. I hemmed them but didn’t stitch them together yet. First, I consulted this tutorial on sewing with faux fur, then I attached a length of fur to each brown piece. Once that was done, I attached the three pieces together.

Korra has this little triangle flap that goes above her pants but underneath her butt cape. Using the same blue fabric as her armbands, I cut out a triangle to the correct size and hemmed it. To keep it in place, I added four snaps to it and the brown cape I had just finished.
Korra’s Leotard
I decided to make Korra’s top a leotard rather than just a tank top, so that it wouldn’t ride up while being active and doing action poses during a photo shoot. I looked up leotard patterns online and found a couple good ones, but would make notes on changes I would have to do to make it work for Korra’s top. For instance, lots of leotards have the seam go down the side, under the person’s arm. Looking closely at references pictures, you can see that Korra’s doesn’t do that at all; instead there’s a panel there that creates two seams in the front and two in the back. So I would have to alter the pattern to accommodate that. Taking that and the asymmetrical front piece into account, it made sense that I would just have to make my own pattern.
I previously planned on making the leotard zip up with an invisible zipper in the back until I remembered that there are some leotard designs that have snaps at the crotch area instead. This would work much better so that I didn’t have unnecessary seams where I didn’t want them. It would also make for much easier trips to the bathroom during conventions.

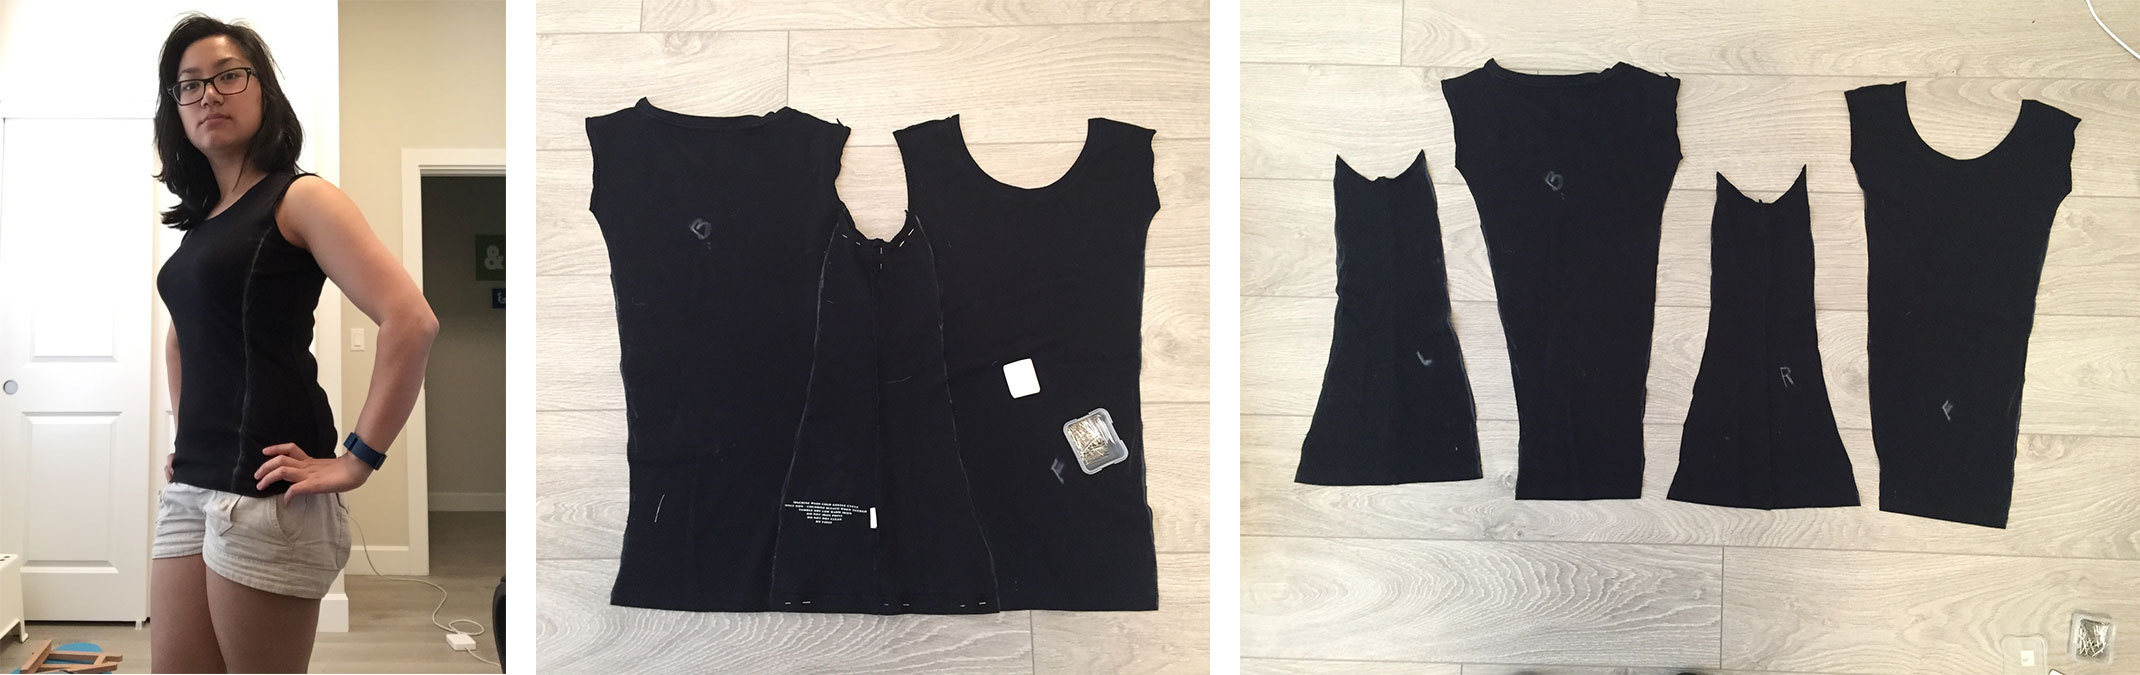
Rather than truly starting from scratch, I used an old t-shirt I had lying around to work as my base. It’s just a simple black shirt I got from Banana Republic that’s formfitting and has properly sized armholes. I cut off the sleeves then put on the shirt, went to the mirror and – using tailor’s chalk – marked where the seams should go for the front and back (see below left image). The back was especially tough to do. I would highly recommend using a dress form instead of what I did. I was strapped for cash so I didn’t have one and also hadn’t made one using the duct-tape method.
I did this for only one side since I knew it was going to be symmetrical. After touching up the lines, double-checking that I was fine with how it looked, and marking the shirt with L, F, and B (Left, Front, Back), I took my scissors to it. I went ahead and cut the seams at the shoulders as well to open up the shirt, then pinned the left side panel to it (see below middle image), traced it out, and cut out the right side panel. These pieces would all of course need to be lengthened to be made into a leotard.
This next part is pretty funny in regards to how I lengthened the separate panels to now be a leotard as opposed to just a shirt. I had of course looked up leotard patterns online and I was familiar with how curved the bottom would be for the leg holes but since I wasn’t using a ready made pattern, I didn’t know how to size it. Not only that, but those patterns were for two-piece leotards, not four-piece. Well, that’s when more frankensteining came in handy. I used a pair of underwear I was okay with sacrificing for the cause and pinned it to all four pieces to get an idea of where the underwear would need to be cut. Even though the front wasn’t super accurate yet, it stilled needed to be extended for the leotard.
After matching up the side seams of the underwear with the side seams of the side panels (the old t-shirt seams came in handy here), I cut out the piece of underwear attached to the left panel. Then I removed all the pins and cut the last piece using the left panel piece for symmetry. This was by no means a perfect process nor would I actually recommend it. I mostly did it because I’m a very visual person and I needed to see what the bottoms of each piece needed to look like. However, in the end, it actually worked out okay! So maybe it wasn’t that bad of an idea after all.
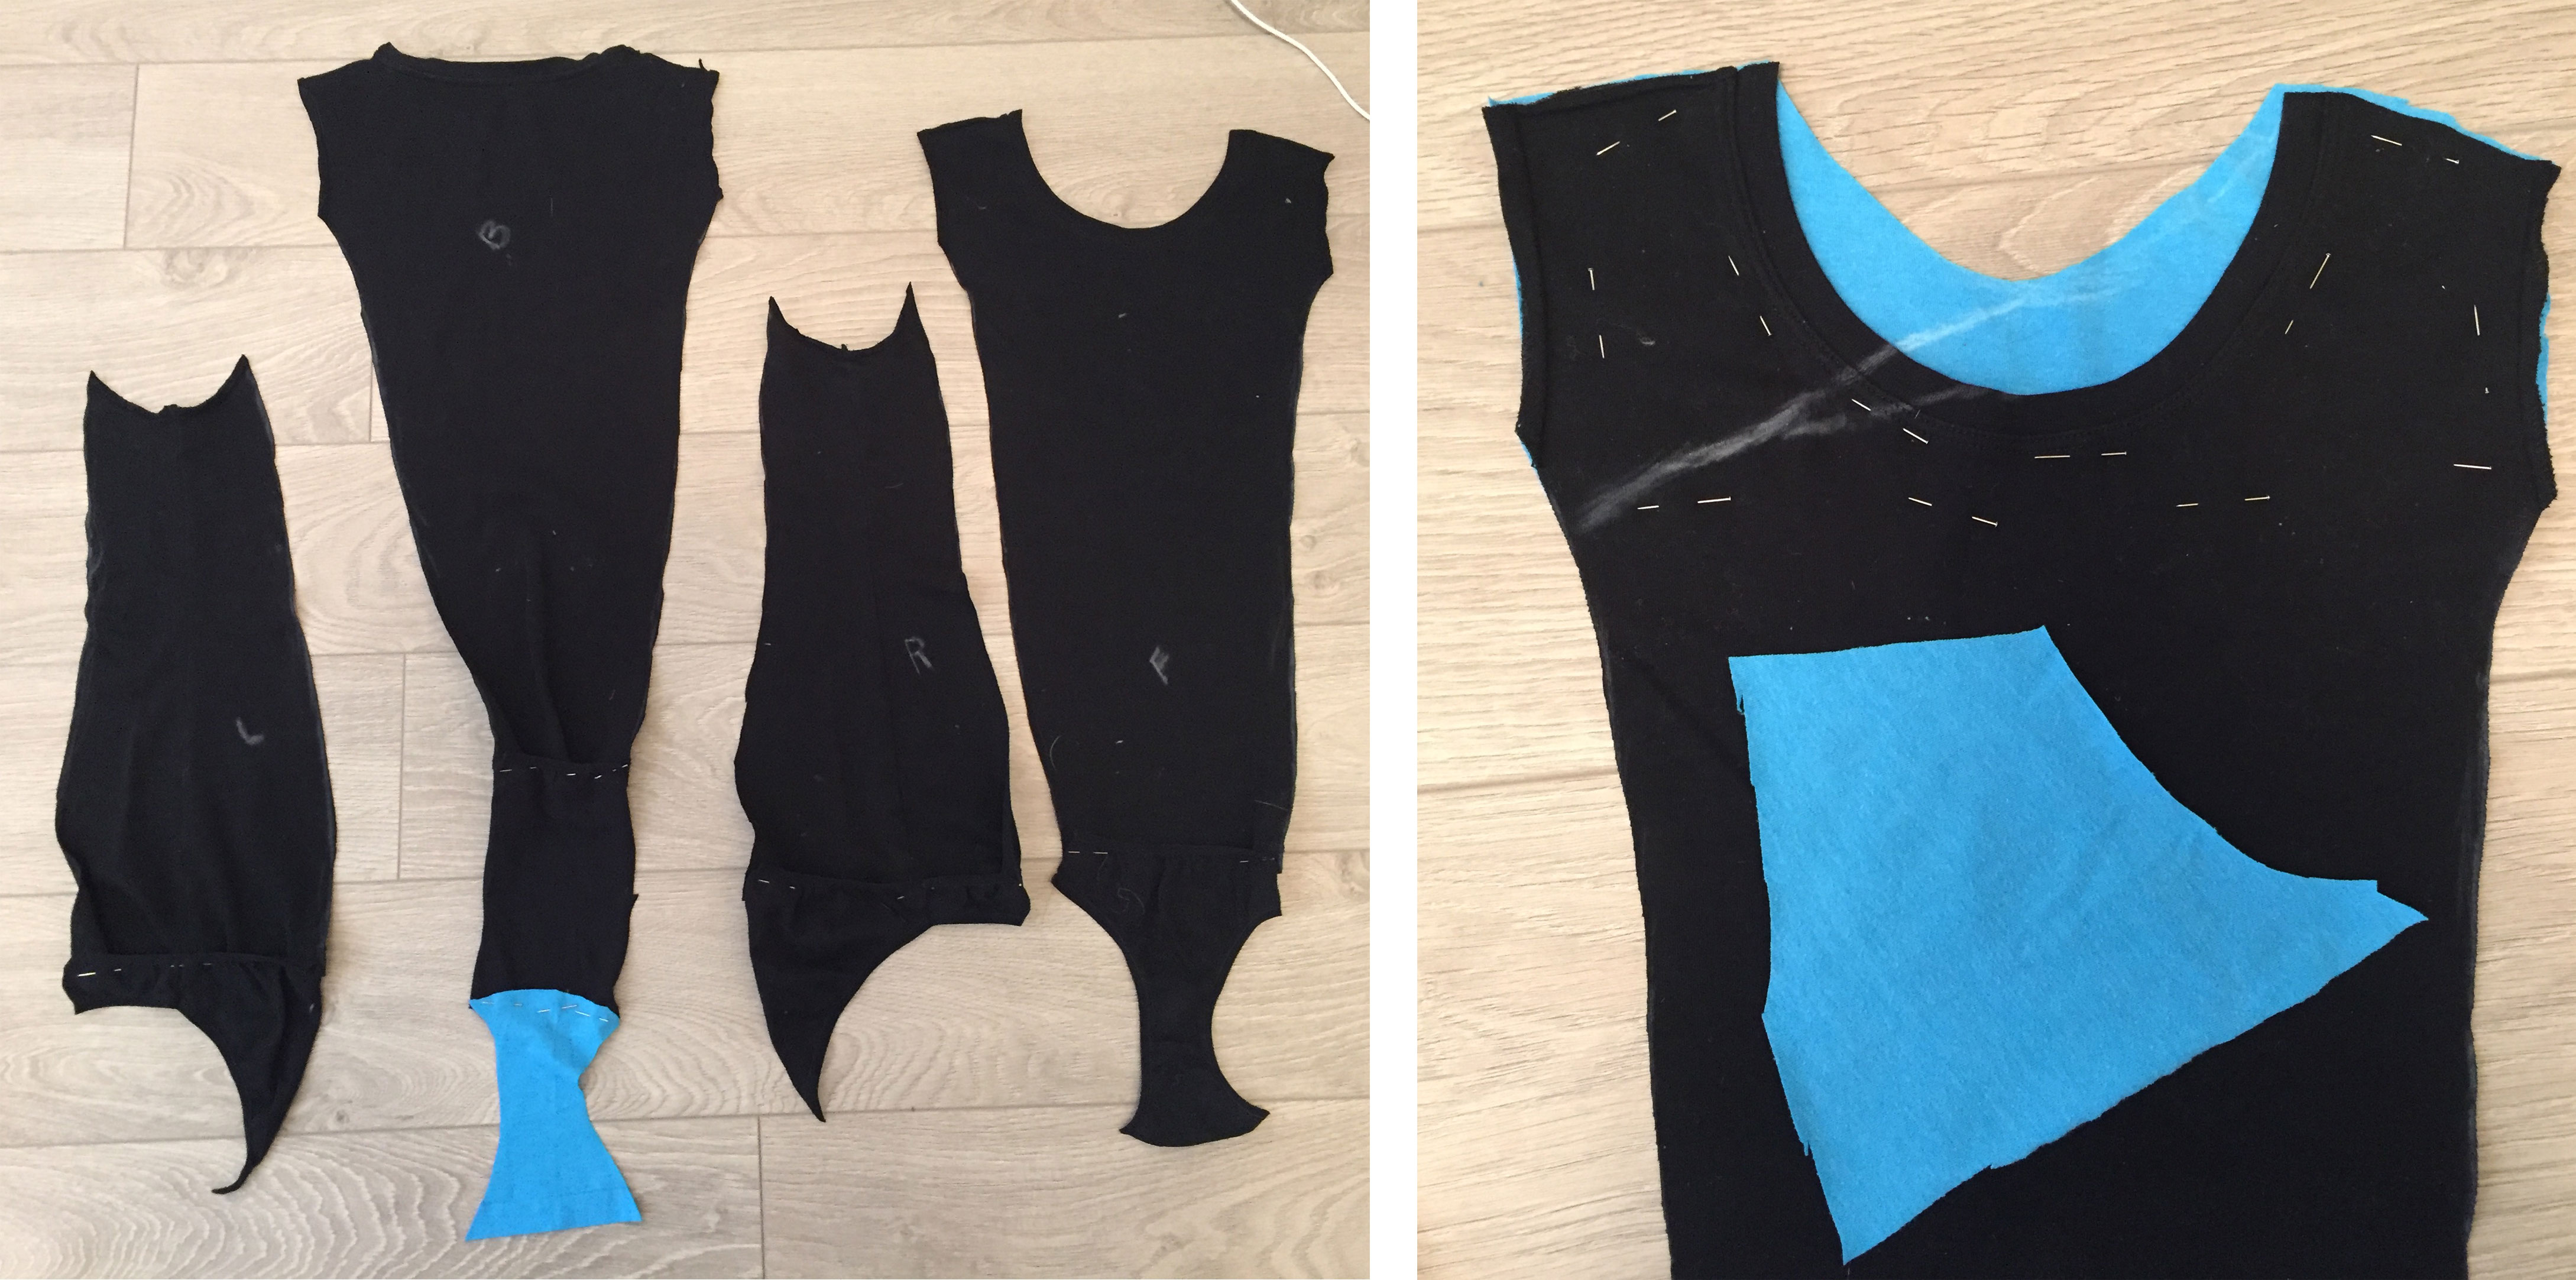
For the back piece, I duplicated the underwear piece that went with the front piece; this was so that the two would overlap and snap the leotard shut. For the front piece, I had to add more fabric since the black shirt was kinda low-cut. I also drew out the line for the asymmetrical fold and then cut out one more piece of fabric that followed the shape that goes underneath it.
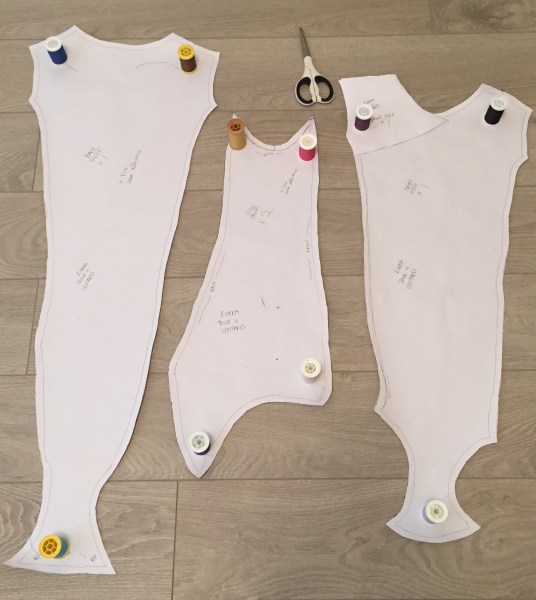
From there, I traced all the pieces onto butcher paper (adding 1cm to all sides for seam allowance) and cut them out as my pattern. I realized afterwards that they weren’t symmetrical at all since I had just traced around all the shirt pieces, so I folded them in half and altered them a bit.
I made a prototype and was extremely pleased to find that there were very few adjustments that needed to be made. The collar’s height needed to be shortened and the front asymmetrical fold needed to be lowered a bit, but other than that it fit and looked great! Words cannot describe how ecstatic I was to find out my hodgepodge process actually worked. I didn’t incorporate the bias tape or interfacing for the collar yet since this test was mostly for fitting; I didn’t want to go through yards of bias tape for just a prototype.

After ordering four swatches from fabric.com and finding one I liked, I bought the final blue fabric for the leotard. The color is a bit lighter than the reference images I used, but I liked how it looked as a whole with the rest of the cosplay. I didn’t take many images of the process of making the final leotard since it followed the same process as the prototype.

The only thing that went a bit awry with the final leotard was the collar. The fabric used for both the prototype and final leotard was stretchy, which made it easy to slip my head through the neck hole. Interfacing, however, is anything but stretchy. I hadn’t thought of this. So when I put the final leotard together and went to put the whole thing on, the neck hole was suddenly very stiff. After lots of squirming around and wondering if I’d actually be able to get into the leotard, I finally managed to put it on. And it looked good! So I had to make a decision: do I redo the collar to not having interfacing? Or do I just leave it as is? I opted to leave it as is considering I was, after all, able to put on and take off the leotard. It just required taking off my glasses and going very slowly and deliberately so that I didn’t rip a seam.
Korra’s Belt
Belt 1.0

I used the same blue fabric for both the belt and the pants. I also used a parachute hook as well as a black seatbelt sort of strap. (Sorry, I forgot what it’s called.)
First I cut out a long piece of blue fabric. I made the width double what I wanted for the belt and the length as long as the long edge of the brown cape piece together (where the belt would eventually be attached). I folded the blue fabric onto itself right side on right side, then sewed the edges together, making sure to leave a gap in the middle to make it easier to turn it inside out.
After turning it right side out, I slid the black belt into the blue fabric, sewed the blue fabric shut, then sewed the parachute buckles onto the belt ends, making sure first that the length was okay. Once that was done, I folded the blue fabric ends over on themselves to hide the raw edges and then sewed that directly to the black belt so that the belt didn’t slide all over the place. Finally, I sewed the blue fabric to the top hem of the brown butt cape.
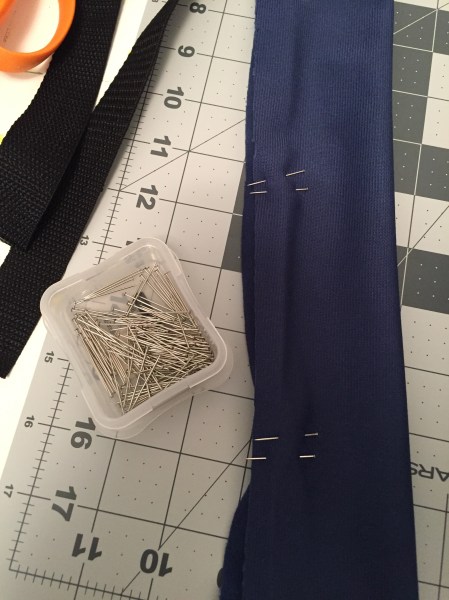
Belt 2.0
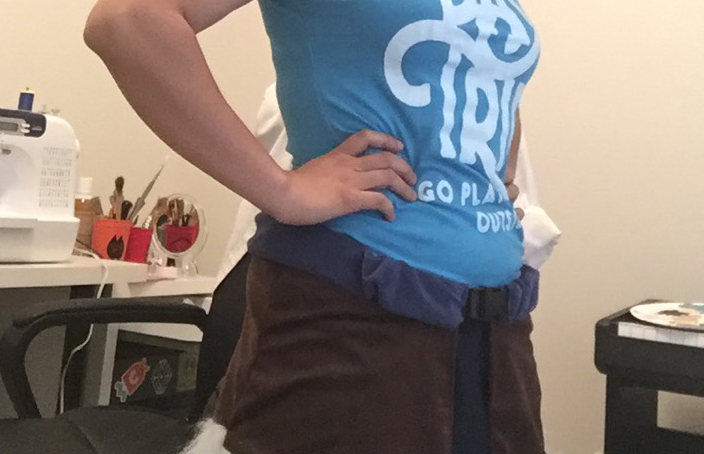
After some consideration, I decided to redo the blue belt. I didn’t like how bulky Belt 1.0 was and how it and the belt buckle (see next section for the belt buckle process) didn’t lay flat against my body. So, I ripped the seam that connected the blue belt to the brown fabric and I cut off the blue fabric from the belt. That left me with just the black belt attached to the parachute buckle, which had the blue belt buckle superglued on.

This time, rather than match the length of the brown fabric, I matched the black part end to end. As it turns out, the brown edge length is longer than the black part, which is why the Belt 1.0 looked bulky; there was too much fabric. So this time, I took a long length of blue fabric, hemmed the edges, then safety pinned it to the very end of one belt end. After testing it, I sewed the ends and also a couple places along the back of the belt (see below right image).
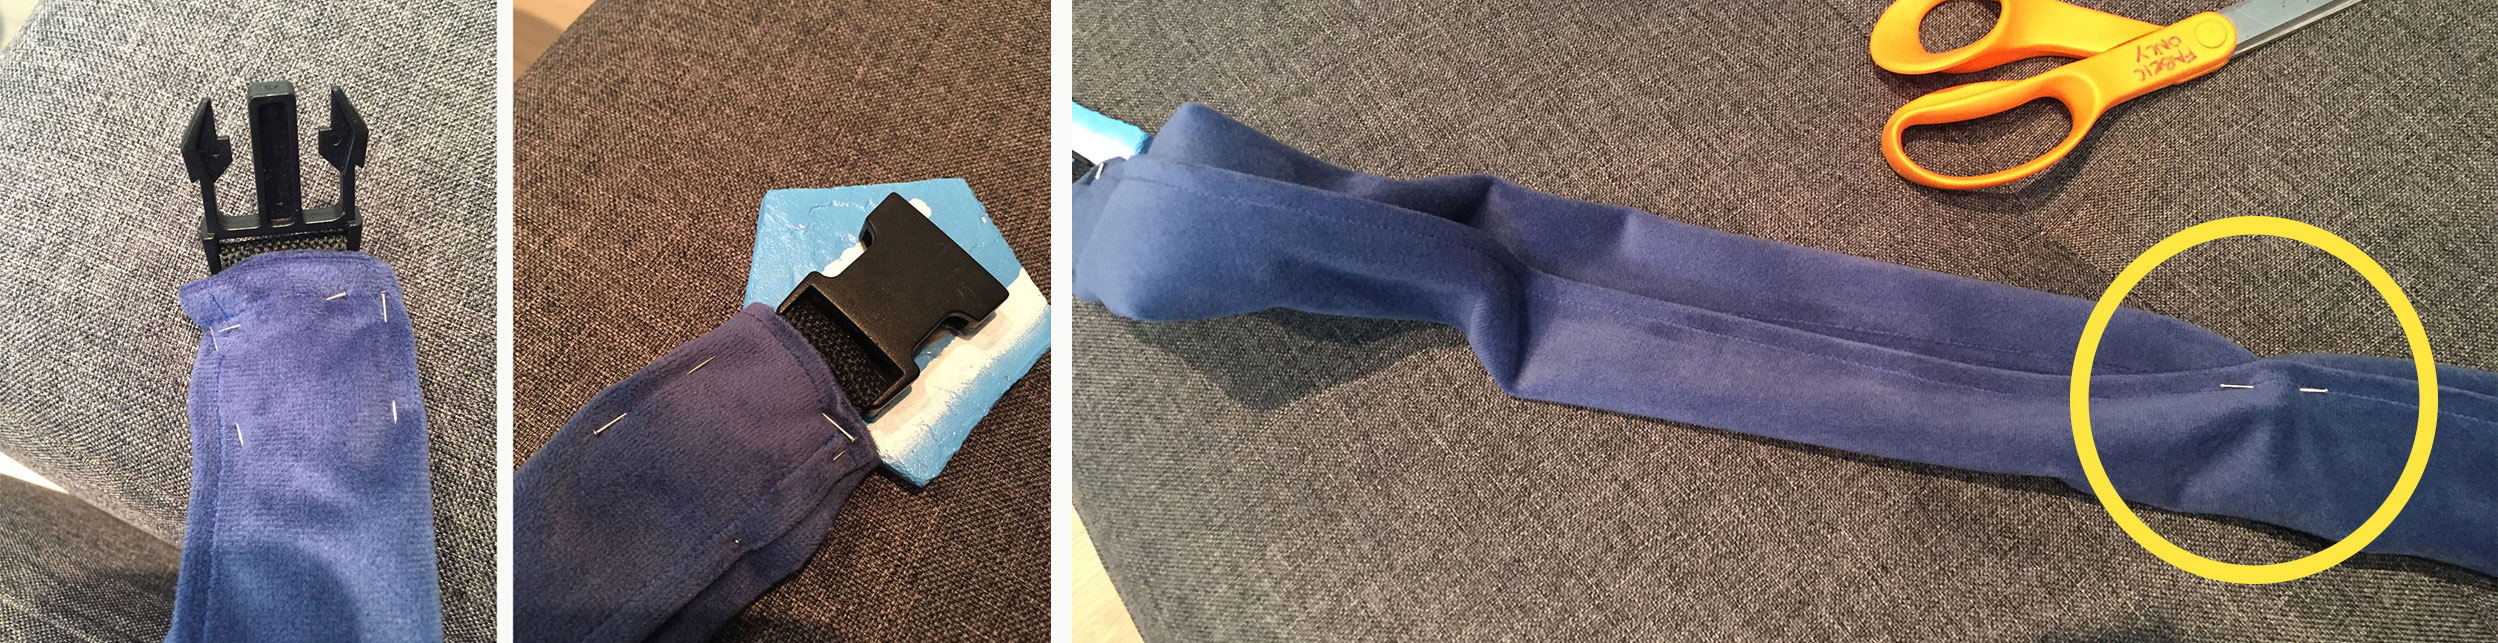
I didn’t want to close the belt completely cause I wanted the fabric to be able to flow nicely. Once I was happy with that, I added one snap to the middle of the blue belt and the other end of the snap to the top edge of the brown fabric, right in the middle. This would ensure that everything stayed where it needed to and there wouldn’t be any gaps. Sewing the blue belt to the brown butt cape didn’t feel necessary since the belt was doing a good job of holding everything in place.

Korra’s Belt Buckle
I’m actually super pleased with my solution for the belt buckle. I originally wanted to try my hand at making one from resin, but the Joann’s I go to didn’t have any. I almost bought some on amazon until I saw some cork board in the store. I also bought a stencil that had different sized stars to work as my pattern for the pentagon so it could be really precise.

After figuring out which star size would be big enough to cover the parachute buckle but not so big that it looked ridiculous, I marked the five points of the star onto cork board. Connecting the dots made a perfect pentagon and I cut two pieces of corkboard out with an X-Acto knife. After hot-gluing the two pieces together, I covered the entire thing in leftover spackling from my Gambol Shroud. After letting that dry and harden, I painted a couple layers of blue on the whole thing.

Once the blue paint dried, I carefully put painter’s tape around the edges for the white paint. I also cut out a tiny little triangle of tape for the middle piece. It was pretty tough making it perfectly equilateral. Then I painted the exposed areas with white paint, let it dry, and took off the tape. Voila! Perfect buckle. I sealed the paint using some old clear nail polish and proceeded to stink up the entire craft room. Had to air it out with a fan. Would not recommend. Pretty sure that nail polish was super old and possibly toxic. Would advise using an actual paint sealant and using said sealant outside with good ventilation.

Once the room was no longer filled with deadly neurotoxin, I superglued the blue belt buckle onto the flat piece of the parachute buckle.
Korra’s Pants
Korra Pants 1.0
I used a pair of brown dance pants I already owned as a sort of template for Korra’s pants. Unfortunately, I didn’t get fabric that was very stretchy, so flexibility was a bit limited in the crotch area.
I started by tracing out the pieces for the pants on some butcher paper, then used that as a pattern for the blue pants. In total I had four pieces: 2 leg pieces and 2 waistband pieces (front and back). I didn’t even fully finish this pair because after putting the two leg pieces together, I realized I hadn’t transferred the pattern correctly and so there wasn’t enough fabric to cover my butt. I had to scrap it before adding the waistband.
Korra Pants 2.0
Now bearing in mind that this thing needs to fit over my butt, I adjusted that for the second pair. I ended up overcorrecting and making them too big to the point that the crotch hanged super low. This was because I was still under the impression that the front and back pieces were perfectly symmetrical as opposed to short in the front and long in the back to accomodate the butt. So I ended up altering these pants by just putting them on inside-out and pinning where to get rid of the extra fabric in the front. It worked out relatively okay, but the length was a bit short. I had to add more fabric to the ankles so that the pants didn’t ride up while kicking, thus exposing my leg skin and looking super unprofessional.
Oh and because it’s me, I of course didn’t realize until I had already completed the pants that I had forgotten to give myself a pocket. Adding it was easy enough, however, because the way I had designed the pattern, there wasn’t a side seam to rip apart; I had to just cut a hole in the fabric to make room for the pocket. Cutting fabric is much easier than seam ripping.

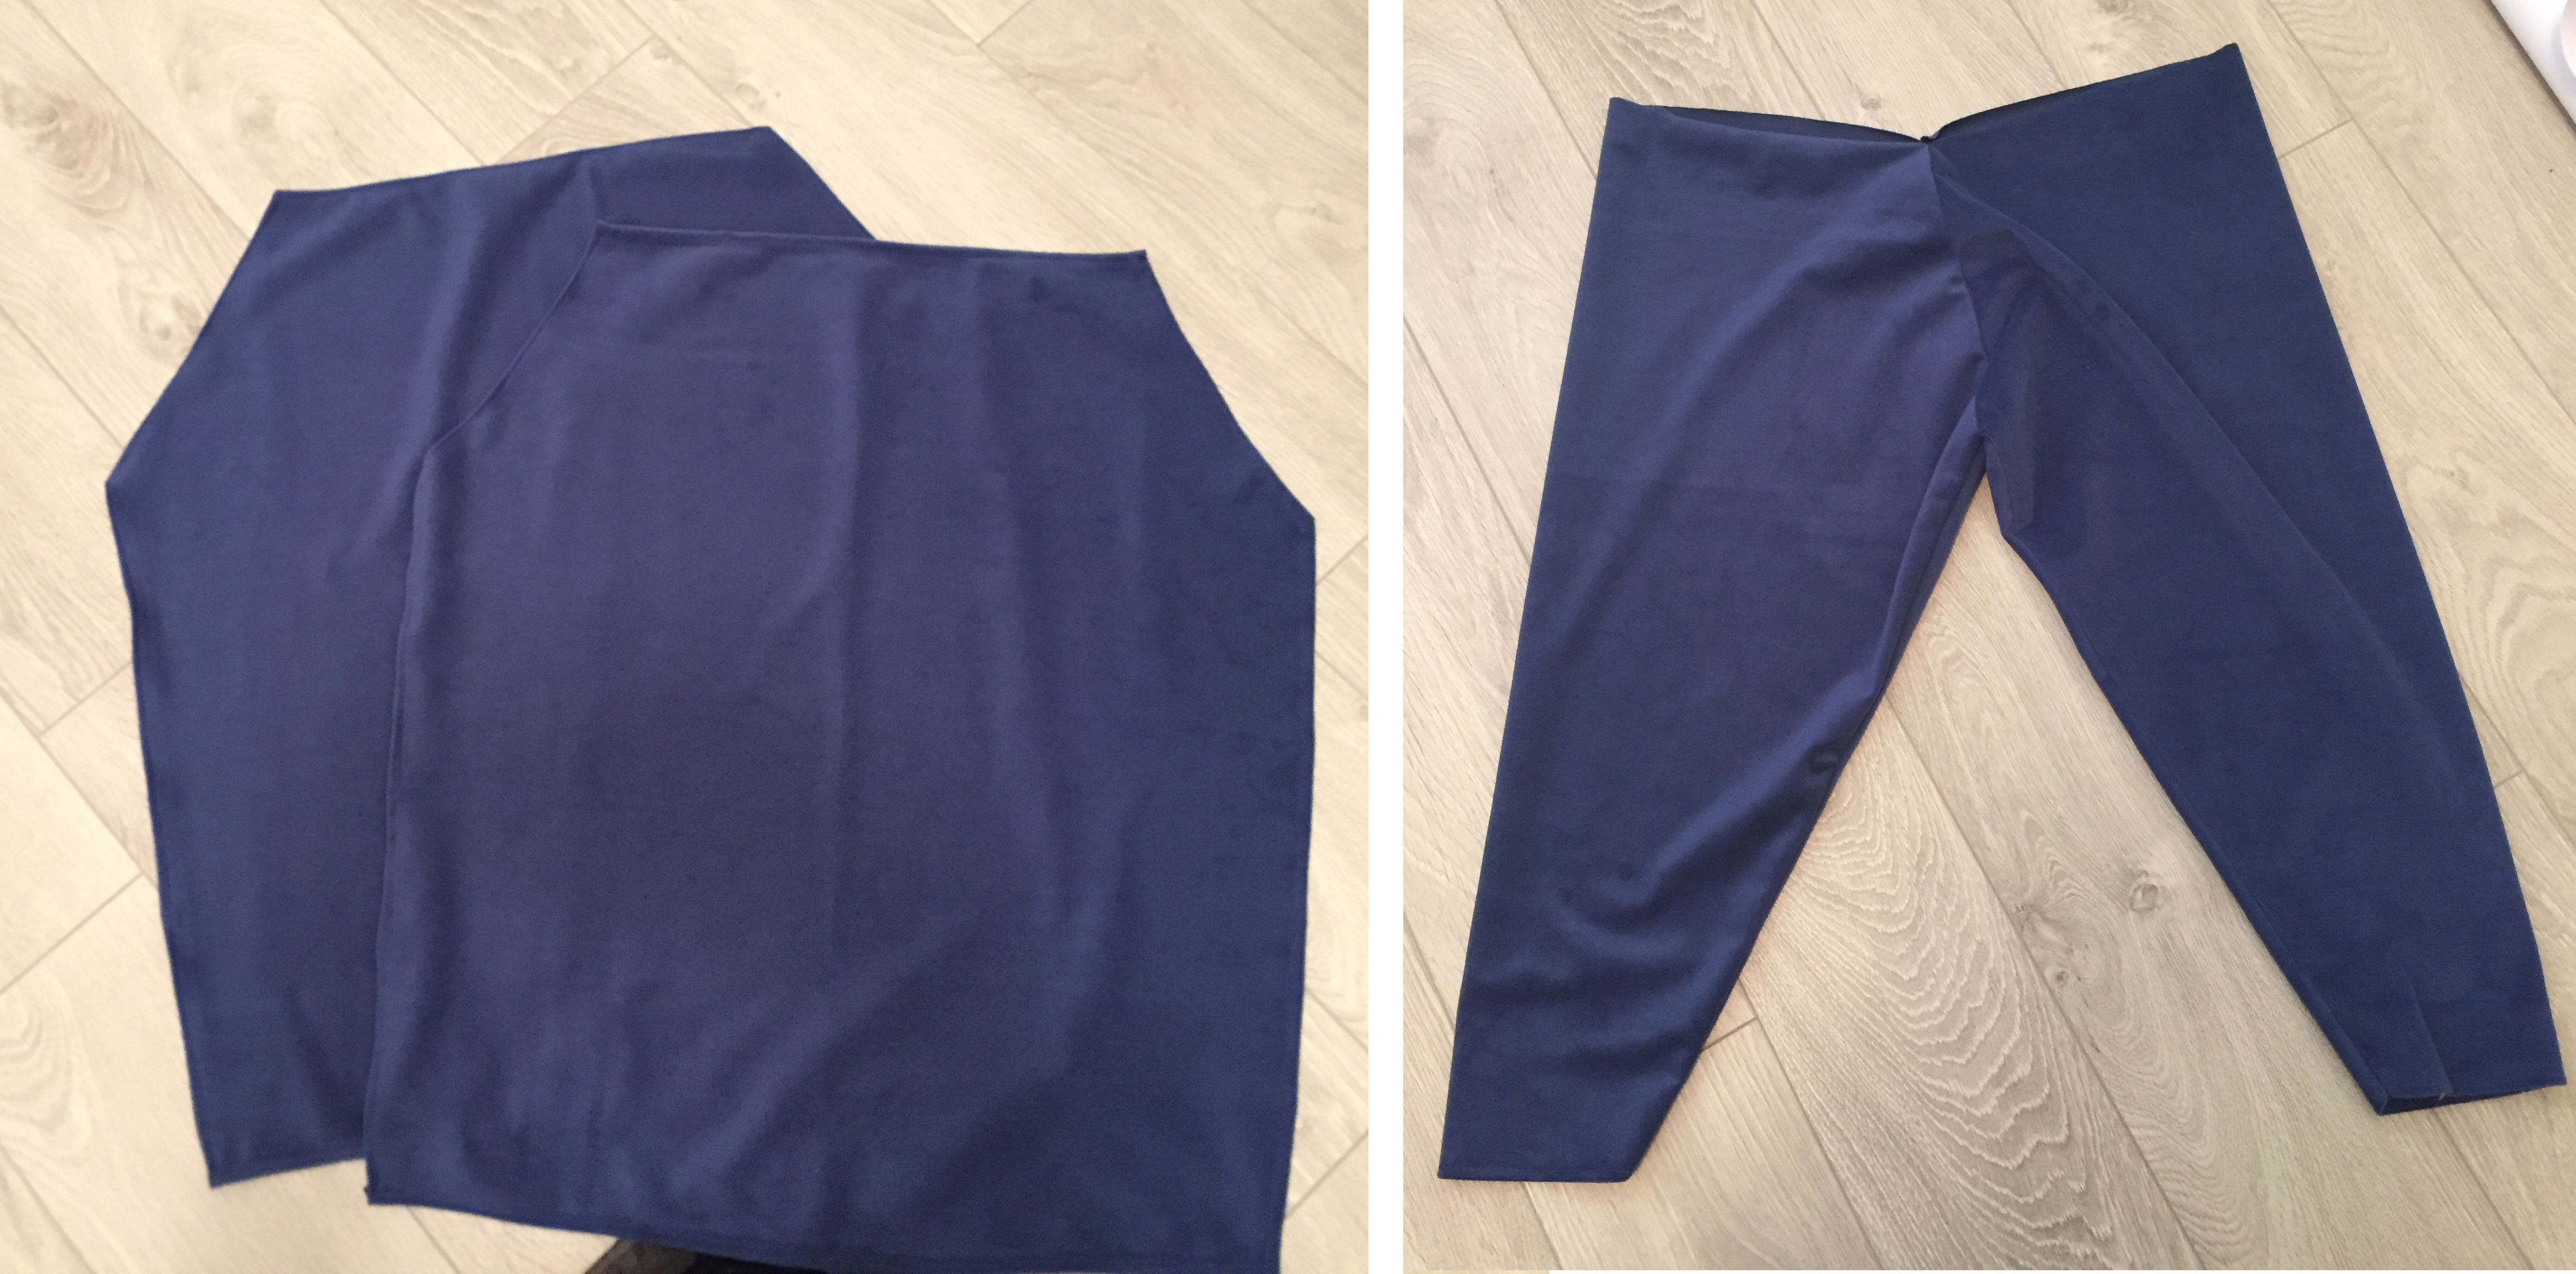
Korra Pants 3.0
I didn’t intend to make a third attempt at pants. It wasn’t until I had changed my cosplay contest entry from Sylveon to Korra that I thought “These pants can and should be better.” I hated how rigid they were and I hated how I couldn’t do leg/kick poses as dynamically as I would have liked. So I bit the bullet, bought more fabric, and bought myself a pattern. I got Simplicity #1367 and used style C. I ended up using the pattern size 16 despite it being too big because I couldn’t find any patterns smaller. It worked out nicely however, because after sewing the inside leg seam and the crotch seam exactly as the pattern was for pattern size 16, it was very easy to alter the pants to have the right length and tightness. What was also nice was I was able to frankenstein the waistband from Pants 2.0 into Pants 3.0. I didn’t even seam rip it; I just cut that sucker off. The waistband needed to be shorter anyway, so it worked out in the end.
Bending Props
I attempted to make my own bending props following this tutorial but because I chose shoddy materials (instead of washers for weights I used magnets) it came out looking pretty bad. Not only that, but I did not realize until after I opened the package that the clear string I had bought was stretchy, which made for a really bad twirling motion. Rather than the motion being nice and smooth, the weight bounced all over the place.

After trying and failing to solve the string problem, I decided to just leave it to a professional and bought a poi fabric ball off Amazon. Not gonna lie, I wouldn’t recommend these for an Avatar/LoK cosplay. The fabric is very short and doesn’t look as flowy as it does in the product image (see above left and middle images). If you want something better, you’d probably be better off either following CosplayInABox’s tutorial or just buying a set from a professional site. I ordered a new veil poi set from Bellydance Discount. The one I ordered is 200cm x 70cm (~78in x ~28in), which is much longer than the blue fabric I had tried to add myself to the Amazon practice poi. I was pretty anxious about receiving this new poi considering it cost me a pretty penny. I wanted to be sure that it was much easier to use, cause you can tell in my early videos on instagram that I’m struggling to get the poi where I want it to go.
After receiving the new veil poi in the mail, I tried it out and it worked like a dream! I still need to practice some more and I have a tendency to go much slower than people normally do for veil poi. I think because I thought it would look prettier that way but in reality, it looks better when done faster and more vigorously.
Here’s a video of the veil poi in action!
Conclusion
Korra was a labor of love and my first ever from scratch cosplay. I made a handful of mistakes along the way but I like to think I learned from them. I even accidentally repeated a mistake from when I was making Blake. (You gotta take the booty into account! Never forget the booty!) I’m more confident with my sewing after completing Korra and less nervous about trying new costume techniques.
And with ALLLLLL of that done, I finally had a completed cosplay. Well. Minus the haircut. So I got a haircut at a local salon (purposefully waiting until about two weeks before Kumoricon since my hair grows back very fast).
Use my build post as inspiration? Let me know!
If you followed along with my build post to help you make your cosplay, I’d love to see it! Leave me a comment or send me an email at ashweezcosplay(at)gmail(dot)com. If you’re comfortable with it, I’d love to showcase your cosplay photo(s) in the blog! I will of course give you credit and link to any socials you may have.

This content is really cool. I have bookmarked it. Do you allow guest post on your blog
? I can provide hi quality articles for you.
Let me know.
That’s an awesome costume! Great job!
Thank you so much! I worked super hard on it 😀