

For Halloween – specifically the Halloween party at work – I wanted to do something recognizable while still being SFW. Lots of my cosplays can be pretty esoteric to people who don’t watch the same shows or play the same games as I do. As luck would have it, a lot of us at the company actually went and watched Avengers 2: Age of Ultron as part of a culture club event when it first came out. I couldn’t really see myself making a low-budget Black Widow in time (and didn’t feel like gender-bending another Avenger) so I went with Wanda Maximoff.


PAX South 2016 in San Antonio, TX by Lindsey Tonak (Jan 2016)
I knew going into this that it wasn’t going to be a 100% accurate cosplay, because I wanted to make use of a black dress I already owned to save money. I also knew it might not look super recognizable without someone else with me also in an Avengers costume, but it’d be a hell of a lot more recognizable than a RWBY costume. Adding the practical effects for Wanda’s telekinetic powers could also help jog people’s memory a bit.
Armbands | Jewelry | Jacket | Telekinetic Powers
What I already had
- Black dress
- Black boots borrowed from a friend (hers were slightly more accurate than the pair I was planning on using)
- A Japanese coin, specifically the coin for 5 yen
- Red pendant for a necklace
- Chain for a necklace
- Some old bracelets with stretchy elastic string and beads
- My naturally long, dark and wavy hair
What I bought
- Black knee-high socks (Target)
- Red tank top (Target)
- Gold rings (Lucky Jeans)
- Black nail polish (HEB)
- Dark gray/black eyeshadow (HEB) Aside: No, I didn’t have any to begin with. Cosplay and weddings are basically the only times I ever use make-up. So I’m slowly adding more to my collection based on cosplay needs.
What I made and modified
Armbands
I didn’t have any leather to make the armbands, so I just settled from some leftover stretchy fabric from my Blake cosplay. I also didn’t want to buy any zippers for them, so I just made them a single piece with a seam to attach the ends. Measurements were super simple: wrist circumference, armband length, and then forearm circumference at the point the armband ends.

Jewelry

At first, for the red bracelet, I tried doing this friendship bracelet knot pattern I had learned in junior high, but I had forgotten that it made a twisting pattern instead of just a flat bracelet, so I stopped and just settled for braiding it. I braided some green pendants into the bracelet to match the bracelet she has in the movie.
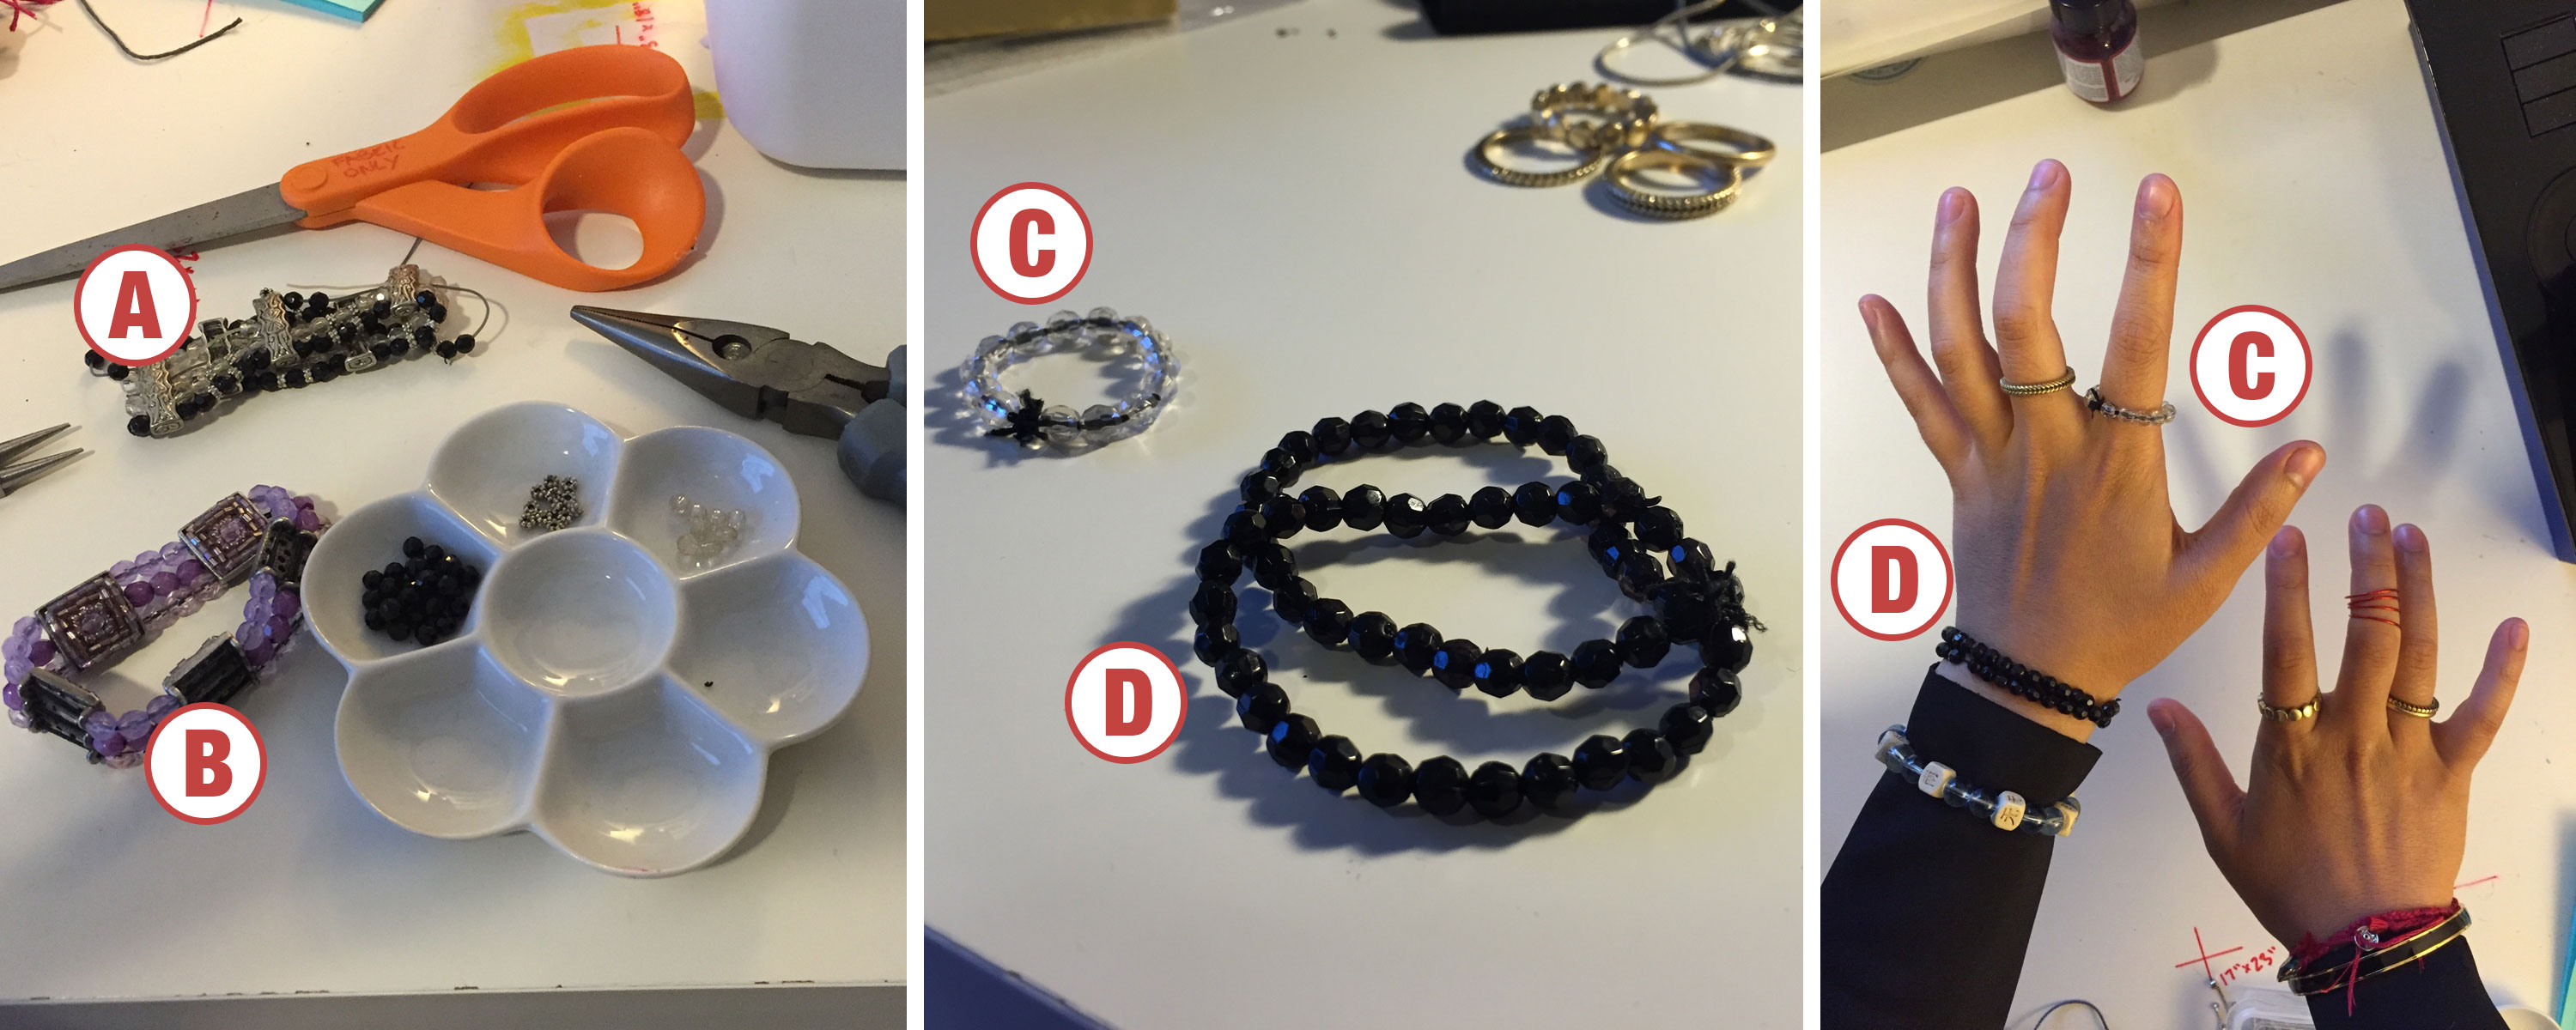
I ended up using some old bracelets I had from ages ago. Took the beads from Bracelet A and the elastic string from Bracelet B to make Ring C and Bracelet D. I had forgotten how time-consuming and tedious the process of beading can be. The ring unfortunately is a bit too loose, so it has a tendency of flying off when I pretend to have magic powers.
The red pendant for the first necklace was not accurate in the slightest, but I really liked it so I decided to use it. Making it into a necklace was as simple as undoing a ring at the end of the old chain, stringing the pendant on, and closing up the ring. The pendant and the chain don’t match at all, but hey, saving money!

The second necklace was a bit more involved. First, I cut out four pieces of hemp string (two blue and two gray). I looped the blue cords around the 5yen coin I had and also included a leftover green pendant. Then, after consulting this handy double fisherman’s knot tutorial, I tied the blue ends to the gray ends. I could’ve just as easily used a gold button, but I liked being able to incorporate the coin I had been carrying around as a good luck charm since 2010.
Ombre dyeing the leather jacket

I didn’t initially plan on dyeing the red leather jacket ombre to match Wanda’s jacket in the movie, but after receiving it in the mail, I knew I had to. The red was just so bright and although it looked okay, it didn’t look right. The acrylic paint and daubers didn’t cost much, so I figured I’d try it out.
Dyeing was a time-consuming process but there was something meditative about it. Thankfully, the paint didn’t smell and one drop covered a lot of surface area. (And now I have plenty of dye leftover if I find myself wanting to burgundy-up something else I own.) It took about two coats of paint to get everything to my liking. Unfortunately, the images don’t really do the ombre justice. It’s just one of those things that looks better in person. I honestly like the jacket better this way. And got quite a few compliments on it at work on Friday.
I took a few hyperlapse videos of the process. You can see that I used two daubers at a time so that one could hold the leather in place while the other did all the smearing. Of course, I still managed to get some on my hands even after taking all these precautions.
Wanda’s telekinetic powers
I have to give a lot of credit to my boyfriend Jason for finding this awesome fabric at Joann’s. (I tried finding it online to link it but couldn’t! Sorry!) I bought that along with some red wire and experimented with how to make the sparks that Wanda ignites throughout the movie.
Telekinetic Powers 1.0
I started by cutting out a rectangle of a fabric (about 2’x1′) and two pieces of red wire about 1.5ft long. Along the long edges of the rectangle, I weaved the wire through the fabric. The fabric was thin and easy to pierce through with the wire. On the wire ends, I bent them into finger-sized circles to go on my hands. When making the finger loops, I weaved it through the fabric again. Otherwise, the fabric slid all along the wire and didn’t look very good.


Telekinetic Powers 2.0
I wasn’t 100% happy with how 1.0 looked, so I decided to try again, this time making separate pieces for each hand. I cut out two fabric square pieces about 1ft wide. Again, I weaved the wire through two edges of the fabric, making sure to leave lots of leftover wire on one end to serve as a bracelet. On the other ends of the wire, I bent the wire into circles for my fingers. The wire bends any which way and can be adjusted, which gives it a nice organic feel.
Final polish
I bought a pair of these red LED lights from Amazon and thankfully got it with plenty of time to incorporate it into my props. Something that I didn’t foresee would come in handy was how the armbands could hold/cover-up the battery packs!
At first, I tried just wrapping the lights in a random fashion and shoving it under the fabric. That looked messy and kept falling out of the fabric. Then I tried just making a loop with the lights, but that made it very obvious that the lights were on a string. Finally, I took some leftover wire and bent it into a circle. Wrapping the LED lights around this circle gave me enough control that it wasn’t unwieldy, but kept the lights in a nice organic placement. The final product looks pretty good if I say so myself, despite how tedious putting it on and taking it off is. The fabric helps to diffuse the lights a little so that they look softer and glowy, rather than too bright.

With clothes and props all done, all that was left was to put on contacts, make-up, and nail polish to complete the look.
If you have any questions about my cosplay, feel free to ask them in the comments!
Use my build post as inspiration? Let me know!
If you followed along with my build post to help you make your cosplay, I’d love to see it! Leave me a comment or send me an email at ashweezcosplay(at)gmail(dot)com. If you’re comfortable with it, I’d love to showcase your cosplay photo(s) in the blog! I will of course give you credit and link to any socials you may have.

Do you have more pictures of the 2.0 hand powers. I’m curious how you made the ball of led lights into a bracelet. I’m trying to do the same thing in another color for my Raven cosplay.
Sorry for the super late reply! I tried to take a picture but it doesn’t explain it well enough so I drew this quick diagram. Practical effects for powers https://imgur.com/a/T5NMpNP hope that helps!
What was the fabric called, I’d like to look it up
I’m sorry, I don’t remember! I’m pretty sure I got it at Joann’s and it was most likely in the glitterbug section. You should be able to ask a Joann’s employee about it.
i don’t understand where you put the circle of red wire with the lights wrapped around them. Do you hold them some how in your palms, does the ring part for your finger attach to it to hold in place?
Yeah, the circle sits in my palms. You’re not gonna be able to do anything with your hands when you have these on. The ring part is just for your fingers.